MANUALLY UPDATE SOLSTICE POD USING IMAGE FILE
The below instructions will help guide you on how to update a Pod via USB in order to resolve "Image Update Required" error. You will need to have access to the physical Pod as well as a USB Drive (2GB or larger) and a USB Mouse (wired or wireless).
First, be sure you are aware of the generation of Pod which will need to be manually updated, this information can be found on the main screen of Solstice Dashboard, or you may physically look at the label located on the bottom of the Pod. Gen3 Pods are labeled with Serial# MPOD8000xxxxxx, Gen2i

The Solstice Local Release file will be required for the next set of steps. Visit the Mersive Solstice Admin Download Center:
https://www.mersive.com/
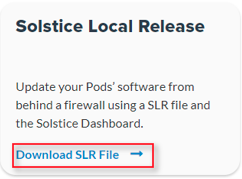
Select "Download SLR File" option:
Plug a 2 GB or larger USB thumb drive into your PC and ensure it is empty and formatted as FAT32
Note: To format and erase all content of the USB thumb drive, right-click on the USB drive, select Format.
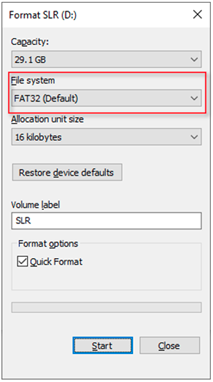
Ensure that the File system is set to FAT32, you may add a Volume label, select “Quick Format” and click Start.
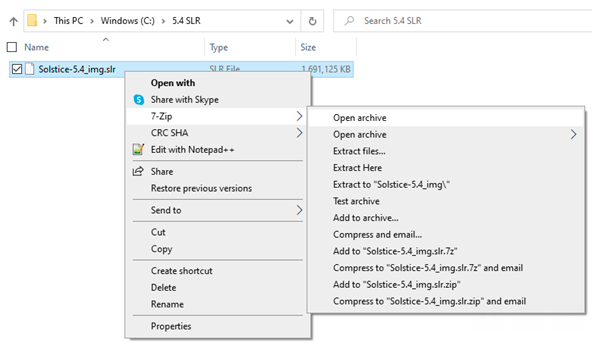
Open the SLR file previously downloaded. If using 7-Zip to open the file, right click on the file, hover over the 7-Zip option and select Open archive.
Note: You may change the file extension from .slr to .zip in order to open the file with your native OS archive manager
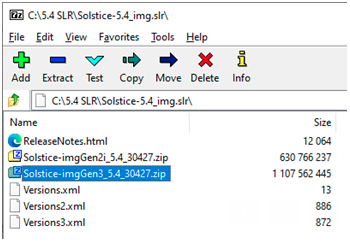
Once open, you will notice two zip image files available, one is for Gen3 Pods and the other is intended for Gen2i Pods.
The file label corresponds to the Pod generation type being updated. Ensure you select the correct file.
Copy the appropriate single Pod firmware image zip file to the empty USB thumb drive:
- For Gen3 Pods, copy:
Solstice-imgGen3_XXXXX.zip
- For Gen2i Pods, copy:
Solstice-imgGen2i_XXXXX.
Once the appropriate zip image file has been transferred to the USB drive, rename the file to: Solstice-img.zip
Note: Windows OS may not show the .zip file extension and only register Solstice-img
To see the full file extension, click on the View menu option, check the box for “File name extensions”
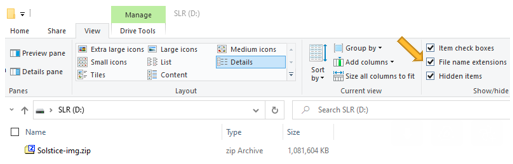
After changing the file name to Solstice-img.zip, eject the USB drive from the PC and insert it into one of the free USB ports located on the back of the Pod.
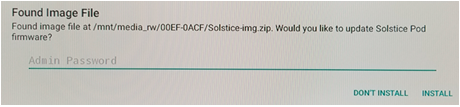
A "Found Image File" notification will pop up with an option to enter an admin password. If the pod is password protected, enter the password. If there is no password, disregard the admin password field, then select the INSTALL option:
Upon completion of the installation and the Pod reboot process the display should no longer display the image update notification.
First, be sure you are aware of the generation of Pod which will need to be manually updated, this information can be found on the main screen of Solstice Dashboard, or you may physically look at the label located on the bottom of the Pod. Gen3 Pods are labeled with Serial# MPOD8000xxxxxx, Gen2i
The Solstice Local Release file will be required for the next set of steps. Visit the Mersive Solstice Admin Download Center:
https://www.mersive.com/
Select "Download SLR File" option:
Plug a 2 GB or larger USB thumb drive into your PC and ensure it is empty and formatted as FAT32
Note: To format and erase all content of the USB thumb drive, right-click on the USB drive, select Format.
Ensure that the File system is set to FAT32, you may add a Volume label, select “Quick Format” and click Start.
Open the SLR file previously downloaded. If using 7-Zip to open the file, right click on the file, hover over the 7-Zip option and select Open archive.
Note: You may change the file extension from .slr to .zip in order to open the file with your native OS archive manager
Once open, you will notice two zip image files available, one is for Gen3 Pods and the other is intended for Gen2i Pods.
The file label corresponds to the Pod generation type being updated. Ensure you select the correct file.
Copy the appropriate single Pod firmware image zip file to the empty USB thumb drive:
- For Gen3 Pods, copy:
Solstice-imgGen3_XXXXX.zip
- For Gen2i Pods, copy:
Solstice-imgGen2i_XXXXX.
Once the appropriate zip image file has been transferred to the USB drive, rename the file to: Solstice-img.zip
Note: Windows OS may not show the .zip file extension and only register Solstice-img
To see the full file extension, click on the View menu option, check the box for “File name extensions”
After changing the file name to Solstice-img.zip, eject the USB drive from the PC and insert it into one of the free USB ports located on the back of the Pod.
A "Found Image File" notification will pop up with an option to enter an admin password. If the pod is password protected, enter the password. If there is no password, disregard the admin password field, then select the INSTALL option:
Upon completion of the installation and the Pod reboot process the display should no longer display the image update notification.